
I am thrilled to be a part of the Sizzix Quilt Blog Hop celebrating Sizzix’s newest Bigz Pro Quilting collection with designs by the artist, author and quilter Victoria Findlay-Wolfe! I am in some amazing company: Victoria Findlay Wolfe, Nicole from Modern Handcraft, Karin from Leigh Laurel Studios, and eight other fabulous quilters! This week you will see some fantastic projects by some of my quilting idols and have a chance to win an awesome prize all at the same time.
To celebrate, I have a quick, easy mini quilt project for you: Color Hexis!
 Every fun project starts with a sketch. I had selected the triangle die without formulating an idea first, so I grabbed my colored pencils and this awesome (free, printable!) triangle graph paper and started sketching some ideas with Carolyn Friedlander’s Botanics and coordinating Kona Solids in mind.
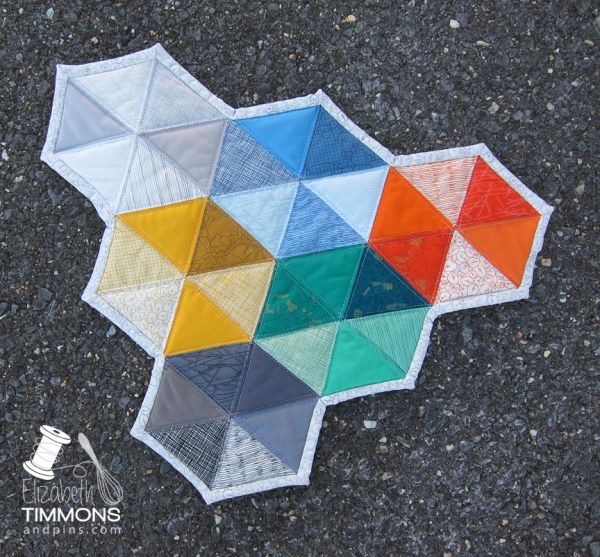
 For the mini Color Hexi quilt all you need are 36 not so random charm squares or scraps (six fabrics for each of your six different color choices), the Sizzix Triangles, Isosceles and Right Die, the Fabi (or Big Shot Pro) Machine, and your choice of backing and binding fabric. I had never used a die cutter for fabric and I was shocked at how little time it took me to transform a stack of charm squares into a stack of perfectly cut triangles.

 Take your triangles to your design wall, table, or floor and play around until you are happy with how the colors flow around the hexis and against each other. If you are like me, you may need to sleep on the idea of the layout before you start sewing. Organize your rows into numbered piles so that you stay organized while sewing.
 Starting with row 1, align your corners and pin as demonstrated below:
 Sew along pinned edge using a 1/4″ seam throughout and press to the left. Repeat for the remaining triangle in row 1.
 Continue sewing the set of row pieces together, alternating which direction you press your seams with each row. With all of your rows well pressed, take row 1 and row 2 and pin your matching seams. You want to sew right across the X of the existing seams.
 This will ensure that you get perfect points.
 Press your seams open and repeat with remaining rows.
 Sandwich, baste, quilt, and bind (bias makes life easier) with your preferred methods. Jaybird Quilts has a great tutorial for binding the inside corners. After a few tries without a tutorial, I was happy that I found that one!
Be sure check out the rest of the Blog Hop this week, you are in for some great projects by some fabulous quilters!
January 16th Jamie Fingal
January 16th Tracy Mooney
January 17th Elizabeth Timmons
January 17th Nicole Daksiewicz
January 18th Ebony Love
January 18th Holly Hughes
January 19th Marni Weaver
January 19th Leslie Jenison
January 20th Karin Jordan
January 20th Sue Bleiweiss
January 21st Jenny Doan
January 21st Victoria Findlay Wolfe
Now, here are the details you really want! Sizzix is giving away an amazing prize of a Big Shot Pro machine and all three of Victoria Findlay Wolfe’s new dies! To enter, click the image for the Rafflecopter entry form.

Thanks for stopping by! What have you been working on lately?
Quilt Details
Pattern: My own design using Sizzix Triangles, Isosceles and Right Die
Front: Botanics by Carolyn Friedlander and coordinating Kona solids
Back: Widescreen in Gray by Carolyn Friedlander
Binding: Botanics Seagrape in Charcoal
Quilting: Aurifil 50WT #2024 (white)
Finished size: approx. 16.5″ across the top x 13.5″ tall
Tagged: 2015 finish, aurifil, giveaway, handmade, mini quilt, quilt, quilting, sewing, sizzix, triangles, tutorial


[…] used my Sizzix triangle die to create another Color Hexi quilt and framed it with gray Essex Linen. I used my new Bernina walking foot to trace each color […]
Love the triangles and your little mini quilt!
Love the triangles!
Color! My favorite tool. You used it well for this.
Never thought to sketch it out first. Duh! You make it look so easy. Thank you for the tutorial.
Very cute little quilt–I like the colors.
My comment didn’t show up, so this hopefully this 2nd try will work. The Sizzix looks like a great tool to own. I hope to have one someday.
I have the Fabi machine but would love to win this bigger machine. love your project. Thanks for sharing.
[…] January 17 Elizabeth Timmons […]
Great tutorial!
Thanks for the demo, looks great
Love your mini quilt!! TFS and THANKS for the Chance to WIN!!!!
Love the triangles! Would love to have one of these! Good luck to everyone! akronne17 (at ) gmail (dot) com
Fun hexis…and that’s a great way to play with the design..love the diamond grid paper!
Your mini is awesome. Thanks for the chance.
Wow what a great giveaway. Thanks for hosting. I would love to win. (debbie at wowilikethat dot com)
The mini quilt is great I love it.
❤ this! I made quilts for my entire family one year for Christmas. I have taken a break…and am ready to get back at it!! Thank you for the opportunity.
rhonda0662@ gmail dot com
I absolutely love this. So many great tips and pointers. I am going to be starting quilting again. Looking forward to more wonderful posts and ideas
I love the look of your quilt. When I scrolled down and saw the picture I thought it would be way too much to do but you made it seem so easy. I may tackle this after all because it really didn’t seem that overwhelming now that I seen you do it. I just love that it is different, most quilts I see are squares or strips. Fantastic job!
I had to give up quilting after I lost the use of three fingers on my right (dominant) hand in April of 2013 due to an injury. I really miss it. It helped me to relax and focus on life when things got rough. I am thinking that with these dies I might be able to get back into it!! LOVE this hexie piece and would love to be the winner of this prize so that I might be able to get back to something I love and miss! TFS!
Looks great! I love how triangle piecing hexies keeps away Y seams, and Julie @Jaybird Quilts really has great tutorials for binding interesting shapes.
I love the mini quilt! thank you for the tutorial!
This does look easy, I definitely need to get me one! Thanks so much! I love the colors!
tdkcarpenoctem@hotmail.com